

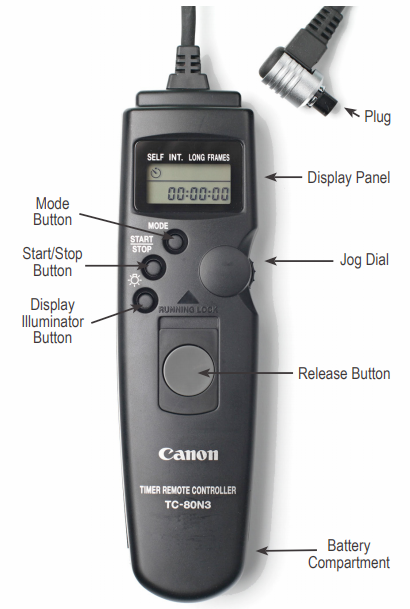
Canon Timer Remote Controller TC-80N3
Remote switch for EOS cameras with the N3-type socket. This remote switch has a self-timer, interval timer, long exposure timer and exposure-count setting feature. The timer can be set from 1 second to 99 hours. A new dial enables you to easily enter the numeric settings with a single thumb. It has an illuminated LCD panel and a 80cm cord.
Overview
The TC-80N3 Timer/Remote Controller is a programmable electronic shutter release. When you connect it to your EOS SLR or DSLR it will allow you to control:
- When the shutter opens (self-timer mode)
- How frequently the shutter opens (interval timer mode)
- How long the shutter stays open (long-exposure timer mode)
- How many exposures the camera will make in total (exposure count mode)
You can also combine modes: For example, you can program the controller to wait five minutes, release the shutter, then take a total of 25 exposures at five minute intervals.
The TC-80N3 also includes a remote switch that provides the same functions as your camera’s shutter button (auto-focus, autoexposure, and shutter release).
When used simply as a remote release (no timer functions), the TC-80N3 does not require battery power.
Compatibility with all my Canon bodies: Canon EOS 7D Mark II, Canon EOS 5D Mark III and Canon EOS 5D Mark IV.
Battery: 1 x CR2032
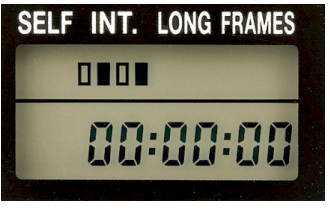
Setting a Time Amount
- Press the Mode Button to select one of the three timing modes (self-timer, interval, or long exposure).
- Press the Jog Dial to select the time unit you wish to set. Each time you press the dial, the time units will blink in the following order: Seconds → Minutes → Hours, in a continuous loop. When the time unit you wish to set is blinking, turn the Jog Dial to the amount you want.
- After setting a time unit, press the Jog Dial once to register it. Time amounts can be set in single digit increments, up to: Seconds: 59 Minutes: 59 Hours: 99
- Repeat Step 3 for any additional time units you wish to set. Once a time unit has been registered it will no longer blink.
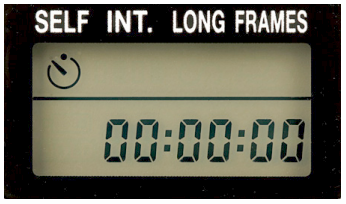
Self-timer Mode
- Use the Jog Dial to set the desired delay time.
- Press the Start/Stop button to start the self-timer.
The Self-timer icon will start blinking and the time display will count down.
The shutter will release when the timer reaches zero (0).
To pause the self-timer before the shutter releases, press the Start/Stop button.
Press it again to resume.
- Do not use the TC-80N3 in combination with your camera’s self-timer. Doing so may interfere with the TC80N3’s timer function.
- You can combine the self-timer with the Long Exposure Mode for Bulb exposures. Setting your camera to Bulb will result in a Bulb exposure only if you have set the the TC80N3 to Long Exposure Mode.
- If you combine the Long Exposure Mode and Interval Timer Mode, both will begin only after the Self-timer delay has elapsed.
Interval Timer Mode
-
- Use the Jog Dial to set the desired time interval.
- Press the Start/Stop button. The camera will immediately take the first exposure. Note: If you want to program a sequence of exposures at a given interval you must set the exposure count to an amount greater than one. Subsequent exposures will be at the interval you have set.
- To pause the interval timer, press the Start/Stop button. Press it again to resume.
Note: The interval you select must be longer than than the combined time of the shutter speed and shutter recocking time, otherwise the result will be continuous shooting.
When you are shooting with electronic flash the time interval you set must be longer than the flash recycle time. If the time interval is less than the recycle time the shutter will not release until the flash unit has recycled. With Canon Speedlites that have the Save Energy (SE) feature, the flash will automatically recycle one minute before the exposure.

Long Exposure Mode
- You must set the camera’s shutter to Bulb (B), otherwise the camera will shoot continuously until the exposure time you have set expires or you run out of exposures, whichever comes first.
- Use the Jog Dial to set the desired exposure time.
- Press the Start/Stop button. The exposure will start, the icon will blink and the exposure time will begin to count down.
- To cancel the exposure, press the Start/Stop button.
Note: For unattended shooting, focus manually. If the camera is set to AF and is unable to find focus it may not release the shutter.
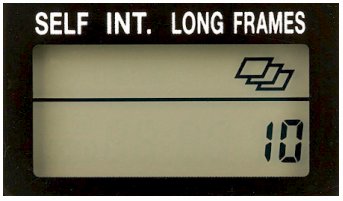
Exposure Count
- Press the Mode Button to select the Exposure Count mode.
- Press the Jog Dial. The exposure count digits will begin to blink.
- Turn the Jog Dial to the number of exposures you want, from 1 to 99. If you set the counter to 00, the number of exposures will limited only by the amount of film or memory card space available.
- Press the Jog Dial to register the number of exposures. Once an amount has been registered the exposure count display will no longer blink.
- Press the Start/Stop button. The camera will begin shooting and will continue until it completes the number of exposures you have. The TC-80N3 will count down the number of exposures. Unless you specify a specific interval, the exposures will be taken at one-second intervals.
Note: When shooting a sequence of exposures with flash, set the interval timer so that the flash will have enough time to recyle between exposures.
Hold Function
The Hold function prevents accidental changes to your settings. It also prevents the Start/Stop Button from accidentally stopping an operation after it has started. To activate this function, press and hold the Display Illuminator Button for at least three seconds until the Hold indicator appears on the display. To cancel this function, press and hold the Display Illuminator Button for at least three seconds until the Hold indicator disappears.
Cancelling the Settings
Simultaneously press the Mode Button, Display Illuminator Button and Jog Dial to cancel all settings. Setting the time or number of exposures to 0 will cancel the respective mode.
Remote Switch Function
The TC-80N3’s Release Button functions in the same way as the Remote Switch RS-80NC. The remote switch function does not require battery power.
As with your camera’s shutter button, you can press the Release Button either halfway or all the way. Pressing it halfway activates your camera’s autofocus and exposure meter. Pressing it all the way will release the shutter. For long exposures or continuous shooting, press the Release Button completely and slide it forward, in the direction of the Running Lock Arrow. This will lock the button in the fully depressed position. To release the button, slide it back to its original position.
Note: Even when the Interval Mode or Self-timer are active, you can still take a picture immediately by pressing the Release Button or your camera’s shutter button. Also note that the timing or exposure count mode you have set will not be affected if you use the Release Button. During a long exposure that is controlled by the TC-80N3, however, the release button will be inoperable.
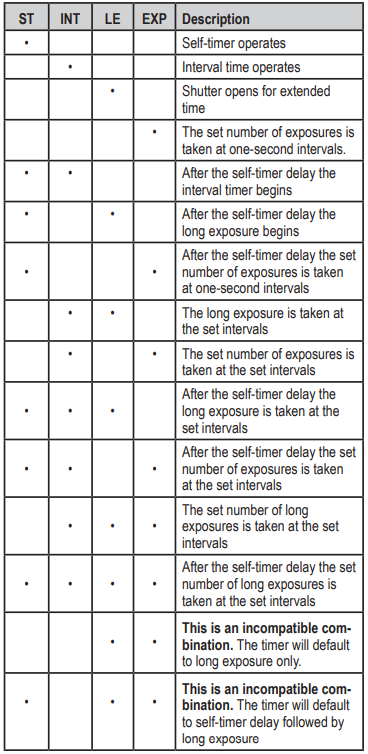
Timer Mode Combinations
Manuals

QuickGuide to Canon Timer Remote Controller TC-80N3.


