
Instructions Manual
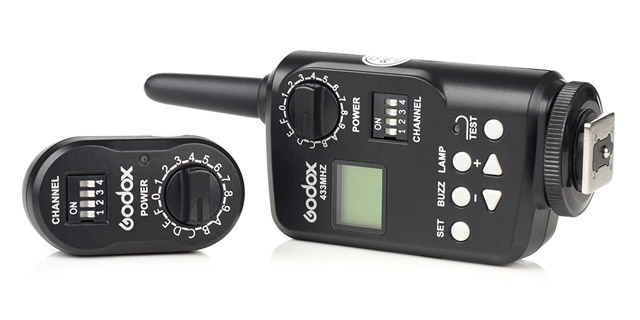
The wireless power-control flash trigger FT-16 is designed for versatile use. When used on Godox flahses (with wireless control port, it is not only a flash trigger, but also incorpates multiple functions, such as, adjusting the power ratio, controlling the on-or-off of the buzzer and the modelling lamp or the AF-assist beam. The trigger set consists of a transmitter (on camera) and a receiver (on flash).
Body
- ON/OFF Switch (Power on (ON), Power off (OFF)
- LCD display
- Power-control Group Select Dial (POWER)
- Channel Select Switch (CHANNEL)
- Set Button (SET)
- Buzz Switch (BUZZ)
- Modeling Lamp Switch (LAMP) AF-assist Beam Switch
- Test Button (TEST)
- <-> Button
- <+> Button
- Hot Shoe
- Indicator
- Antenna
- Battery Compartment
- Wireless Control Plug
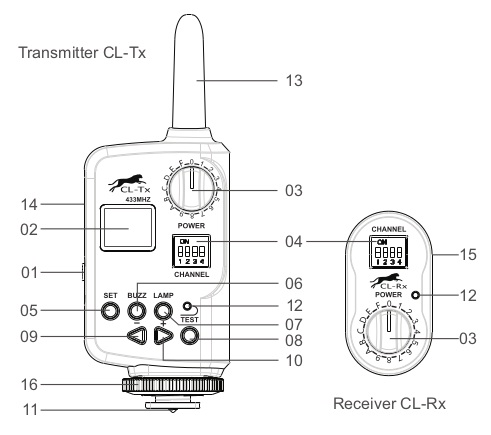
Transmitter: FT-16
Receiver: FTR-16
In USA the transmitter and receiver are also called: Cheetah CL-Tx and CL-Rx
Battery
The transmitter needs two size AA batteries. The receiver draws power from a flash through the flash’s Wireless Control Port. Slide the battery compartment cover of the transmitter and insert the batteries.
Low battery indication: When the battery power (<2.2V) gets low, a low battery symbol is shown on the LCD display. Please change batteries as low batteri power leads to no flash or flash missing in case of long distance.
Power Switch
Turn the transmitter on by sliding the ON/OFF Switch to ON. The LCS display will then light up.
Turn the transmitter off to save power if it will not be used for an extended period of time.
Power-Ratio Display Mode
The trigger set has two modes to display a flash’s power ratio.
- 1/128~1/1: widely adopted in most shoe mount flashes.
- 5.0~10: widely adopted in most studio flashes.
The two display modes can be switched over by pressing the Set Button and holding for 2s.
Channel Select Switch
The trigger set provides 16 channels for communication. Set the transmitter and the receiver to the same channel before use.
Check the following table for channel settings:
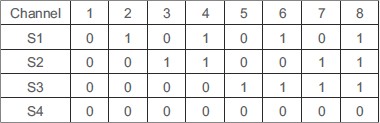
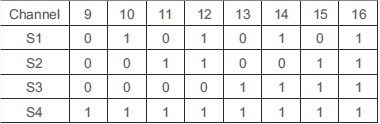
The transmitter and the receiver must be set to the same channel for wireless control, or the receiver will not respond.
Power-Control Group Selection
Both the transmitter and the receiver have a 16-grade Power Control Group Select Dial (hereinafter referred to as Dial). With these 16 grades, you can wirelessly control up to 16 flash groups in terms of the following functions: adjusting the power ratios and turning on/off the buzzer and the AF-assist beam, as well as flash triggering.
Attach the receiver(s) on multiple flashes/one flash and set the dial of each receiver to the same grade. This is a flash group.
Then attach the transmitter on the camera’s hotshoe or hold it in hand, and set the Dial to the same grade as that of receiver(s). The flashes will be under your command.
1. The Dial of the transmitter and the receiver must be set to the same grade. Otherwise, the receiver will not respond.
2. Flash triggering is only related to the Channel Select Switch. The Power-Control Group Select Dial only decides
which flash or flash group to be controlled in terms of functions such as power setting.
Other Buttons
Set Button (SET)
Press the Set button and settings on the transmitter will be communicated with the flash through the receiver. A communication symbol will blink for a second. on the LCD display.
Press and hold the Set button for 2 sec. to switch the powerratio display mode.
Buzz Switch (BUZZ)
Press the Buzz Switch to turn the buzzer on or off. When the buzzer is turned on, will be shown on the LCD display.
AF-Assist Beam Switch (LAMP)
Press the switch to turn the AF-assist beam on or off. When the beam is turned on, will be shown on the LCD display.
<-><+> Button
Press the <-> or <+> button to decrease or increase the power ratio. “OF, 1/128~1/1” for shoe mount flashes. “OF” means the flash triggering function is shut down on the flash.
Test Button (TEST)
Press Test Button to fire the flash. Both the indicators on the transmitter and the receiver will blink.
Wireless Adjusting Flash Settings
The trigger set can wirelessly adjust the following settings: the flash power ratio, the on-or-off of the buzzer and the AF-assist beam, as well as the power-ratio display mode.
On the transmitter and the receiver, set the Channel Select Switch to the same position and the Power-Control Group Select Dial to the same grade.
Insert the receiver into the Wireless Control Port of the flash unit. Then power the flash on.
Adjust the flash settings on your transmitter.
Wireless Triggering
On the transmitter and the receiver, set the Channel Select Switch to the same position.
Insert the receiver into the Wireless Control Port of the flash unit. Then power the flash on.
Press the Test Button to fire a flash. Alternatively, you can set the transmitter onto the camera’s hot shoe and press the camera’s shutter-release button to fire a flash.
Technical Data
Transmitter Power Supply: 3V (2*AA Ni-MH or alkaline batteries )
Receiver Power Supply: 5V (powered by flashes)
Transmit Frequency: 433MHz wireless remote system
Workable Distance: 300ft (open areas)
Control on Flashes: Flash power ratio, AF-assist beam on/off, Buzzer on/off, Power-ratio display mode, Flash triggering
Max. Sync. Speed: 1/250 second
Channel: 16
Download: Godox FT-16 Instruction manual
Note:
The Godox FT-15 transmitter do not support HSS (High Speed Sync Flash) but you might be able to do it with some additional triggers. See more information here at FlashHavoc,com